IanCanada
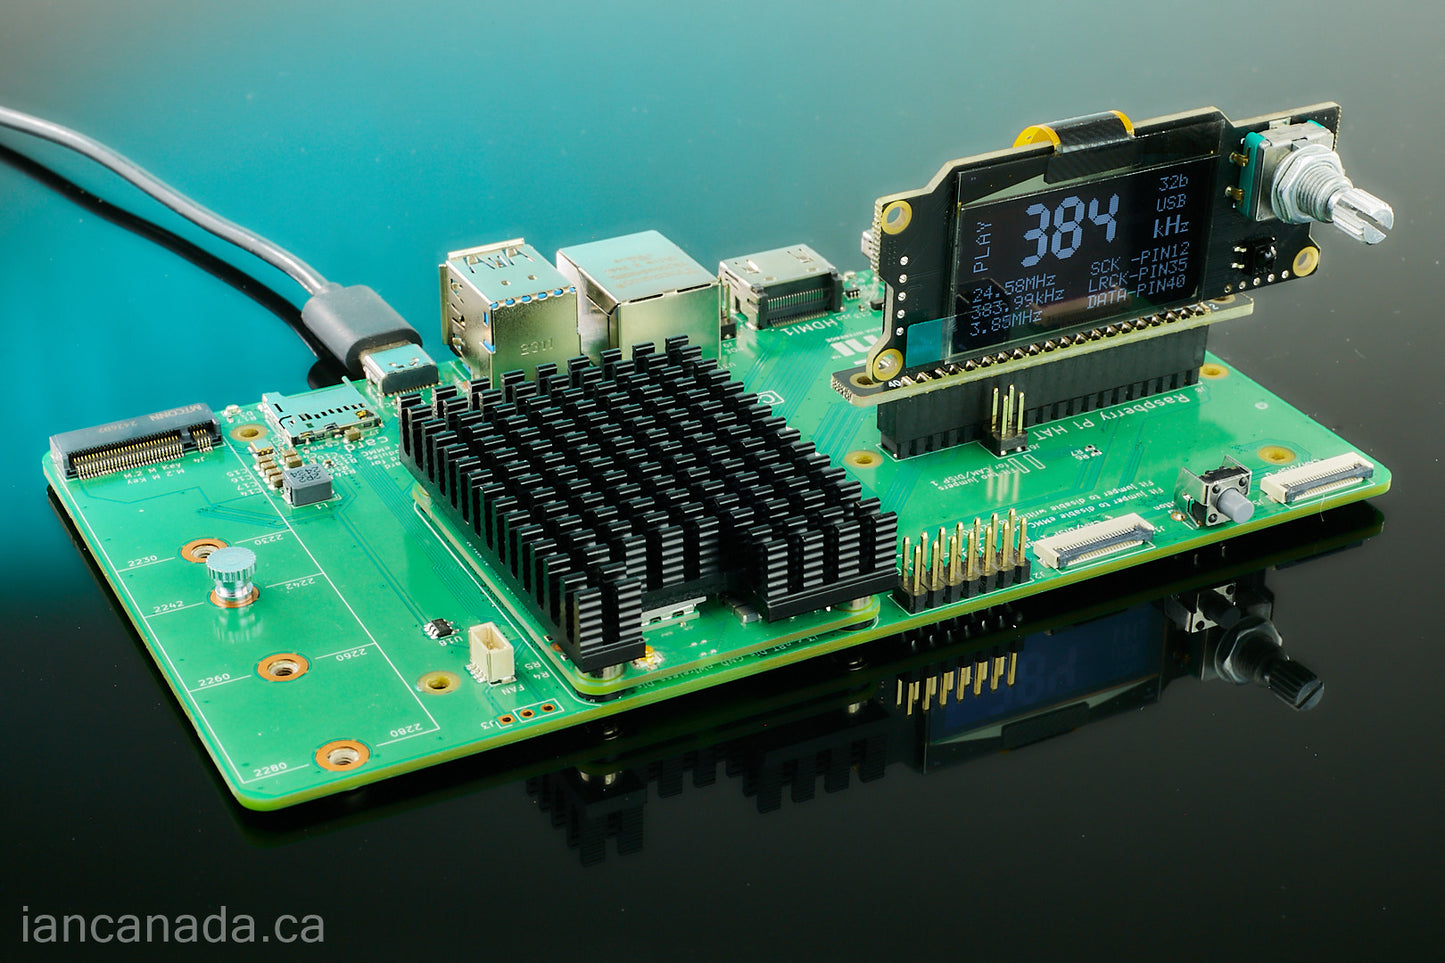
StationPiCM5 Six-In-One Multifunction CM5 Audio Base Adapter
StationPiCM5 Six-In-One Multifunction CM5 Audio Base Adapter
Couldn't load pickup availability
Introduce StationPi CM5
StationPiCM5 is a newly designed six-in-one multifunction CM5 audio base adapter PCB. It enables the development of even nice and more professional digital audio reclocker/streamer/DDC/DAC projects by making use of the most powerful RaspberryPi CM5.
Features and Specifications
- Carefully designed dedicated CM5 Audio Base adapter
- High performance RPi 5V low noise filter/cleaner (Power from GPIO)
- Ultra-low noise 3.3V/2A power supply for audio clean side. Output Noise: 3.3uV RMS (10Hz-100KHz)
- EMI shield plate
- Power management
- Soft power button
Connectors, Switch and Button
J1: GPIO socket to connect to the CM5 IO board
J2: GPIO connector between CM5 and audio HAT such as a FifoPi
J10: Dedicated and independent GPIO connector to install pure audio HATs on the left side. J10 will be 100% isolated from J2 and any other sections of the StationPi CM5. J10 is optional but needs connecting U.FL and other cables to J11-J14 when use.
J15: USB-C 5V power input. High quality USB power adapter such as Anker or UGREEN 65W or higher are highly recommended. Though they use private PD protocol, the RaspberryPi official 45/27W USB power adapters can also be used by StationPi CM5.
J4, J5: Low-noise 3.3V output (Switched)
J3: Optional 5V Input/Output
Works as output (unstitched) when feed 5V power supply to J15
Or, as 5V input (with polarity and over voltage protection) if J15 is unconnected.
J8: Power good signal, can be used for sync ON/OFF control of external power supplies
J9: Soft power up signal (Optional, need software to enable)
J6: Can be connected to CM5 IO J2 power button pins to use S1 as CM5 power button
J11,J12,J13,J14: U.FL SCK,LRCK,DATA and I2C connectors when use J10 as independent audio GPIO.
S2: ON/OFF switch for both CM5 5V and lower-noise 3.3V power supplies
S1: Optional power button (J6 need to be connected to enable)
StationPiCM5 KIT includes
- StationPiCM5 PCB assembly
- 17mm/M2.5 standoffs x 6
- 13mm/M2.5 standoffs x 12
- 6mm/M2.5 standoffs x 8
- M2.5 nuts/screws x 14
CM5 software installation/Validation to NVMe/eMMC

A Step-by-Step Guide to Building Your CM5-Based Streamer/DAC project
StationPiCM5 Project Examples
Standard Re-clock Streamer Configuration

Advanced Re-clock Streamer configuration

With power supply upgraded

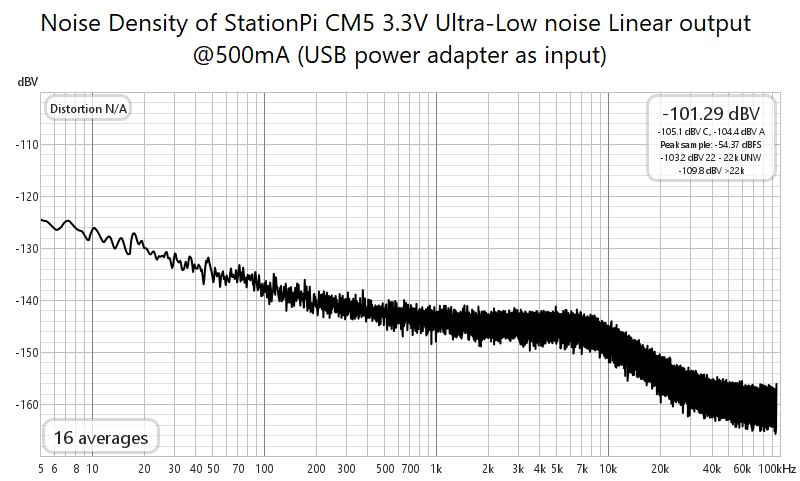
Power supply Noise Measurement Results
- Noise density of the input standard high quality 65W USB-C 5V power adapter @1A output current.

- Noise density of the StationPi CM5 5V output for CM5 after noise filter @1A output current with the same USB-C power adapter as input.

- Noise density of the StationPi CM5 Linear Ultra-Low Noise 3.3V output @500mA output current with the same USB-C power adapter as input.
-125dBV (0.56uV) @ 5Hz
-138dBV (0.13uV) @ 100Hz
-144dBV (63nV) @ 1kHz
-160dBV (10nV) @ 90kHz